
 Jamie's invites are already featured on my website but I have not done a blog on them yet! Don't you just LOVE the colors! Green has to be my favorite color (yes... I actually, secretly love green, more than pink... but not by much!) I think green is such a great main color and also an amazing accent color. For Jamie's invites we chose to do a custom scored pocket in bronze brown with green tea backing card stock and band wrap. For the ribbon embellishment we chose to go with a cream scalloped ribbon, which is one of my favorite ribbons to use! I love the chic/vintage look of it! The invitations where printed on cream linen paper with perfectly matching shades of ink.
These green and brown invites have been a huge hit this spring and I must say that I love all my work, but these invites are one of my faves! Congratulations Jamie!
Wednesday, February 27, 2008
Jamie's Invites
Posted by
Megan Bailey - Pink Piggy
at
11:47 AM
0
comments
![]()
Wednesday, February 20, 2008
Pantywast & Co Launch Party!


 Pantywaist & Co is a unique and chic custom children's boutique. They offer crib sets, custom quilts, blankets, bibs, playtime tee-pees, infants and children’s clothing, children’s chic decor, mom aprons, grocery cart covers, onsie sets, shoes, diaper bags, leggies, limb warmers, and much more!
Pantywaist & Co will be having a launch party on March 15th 2008 @ NOAHS in lindon from 10am-3pm . Come check out all their chic custom products!
I'm so excited to be one of the hosts for the launch party and you can be one too! There is a great Hosting package and all you will have to do is mail out your invites and in exchange you will receive a 5% credit on all orders that come through you! And you don't have to host it at your house! cant beat that! email Audrey at info@pantywaistandco.com or call her at 801.836.3089 or of course you can also reach her through Studio Stems contact info!
Pink Piggy will also have a display there with our NEW line of custom baby announcements! This will be the first time the baby line will be introduced so make sure you stop by to get a sneak peak of these amazing announcements!
Darla with Darla Roze Photography will also be there! Her adorable baby pics and our announcements go hand in hand! So come check out this amazing party and make sure you get involved with hosting so you can receive the credits to use towards your own purchases! Spread the word!
Posted by
Megan Bailey - Pink Piggy
at
12:39 PM
0
comments
![]()
Wednesday, February 13, 2008
Home-Made Valentiens Day Cards!

Hearts and Blocks Valentines
2. When planning designs, experiment with color and form: Try complementing pink with neutrals and greens, or use pale-colored ink on dark paper. Combine shapes in unexpected ways to create elegant effects: A silhouetted heart surrounded by color blocks, for example, suits the space as nicely as hearts in rows.

Heart Seals
 Glittered Cards
1. Start with stamp rubber-side up. Ink the stamp by lightly tapping with ink pad. Once the stamp is completely covered, lift it straight up. Hold stamp an inch from your mouth and "huff" on it to remoisten the ink.
2. Using a ruled cutting mat as a guide, find the center of your card. Stamp the image onto card. Let ink dry.
3. Highlight details with a fine-tip glue pen. Sprinkle glitter. Let dry.
4. Sign name in ink color that matches stamps. Brush off excess glitter with a soft paintbrush.

Stiched Hearts
1. Fold a piece of construction paper into a card (our card is a 5 1/2-inch square), or use a blank pre-made card. Using scissors or a heart craft punch, cut six same-size, 1 1/2-inch-tall heart shapes from construction paper in different colors (if using scissors, use one heart as a template to trace the remaining five). Fold hearts in half lengthwise, creating creases down their centers.
2. Cut two 2-by-4 1/2-inch paper rectangles. Use a small piece of double-sided tape to affix each rectangle horizontally to the front of the card (as shown). Make two pencil marks on each heart's center crease, 1/2 inch apart; use a microhole punch or an embroidery needle to make a hole at each mark.
3. Affix three hearts to each rectangle on the card, overlapping the hearts slightly (as shown). Poke the needle through the holes in each heart and through the front of the card. Cut a 3 1/2-inch length of waxed twine, and thread it through the holes of one heart so that a single stitch shows on the outside and the loose ends are inside. Pull loose ends of twine until the stitch is taut, and tie in a knot. Trim ends. Repeat with remaining hearts.

Valentine Flowers
1. Cut out five to eight hearts of the same size, and inscribe them. Use a pushpin to make a hole near the pointed end of each heart.
2. For a wire stem, thread a small bead onto a piece of 24-gauge wire cut a little longer than you want the stem to be; twist the wire so the bead stays at the end. Thread hearts on the other end until all the hearts are stacked against the bead. Twist the wire again to keep the hearts in place. Cover the stem with floral tape, or glue ribbon around the wire.
3. For a ribbon stem, thread a bead to the center of a 3-inch length of wire, and bend the wire in half. Send the ends through the hole in each heart. On the back, form the two ends into a small loop around the midpoint of a length of ribbon; trim the excess wire.

Classic valentine messages never go out of style. You can shape individual strips of paper, curling the ends as you would a ribbon, to form letters that resemble calligraphy. Use carefully placed dabs of craft glue to hold each letter in place
Posted by
Megan Bailey - Pink Piggy
at
10:49 AM
0
comments
![]()
Thursday, February 7, 2008
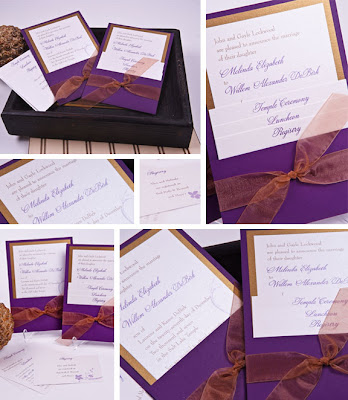
Melinda's Invites
 Purple is always a popular wedding color every season and it can be combined with different accent colors to really bring out a particular style and feel. For Melinda's invites we went with a gold metallic accent paper with matching purple and gold ink and an iridescent gold ribbon. Gold is such a great accent color to any color pallets, but yellows and gold really look amazing with purple because they are complimentary colors. These colors where great for a winter wedding and like I have said before that any color can work for any season... it just depends on what accent colors you incorporate into your pallet as well!
Posted by
Megan Bailey - Pink Piggy
at
10:10 PM
0
comments
![]()
Sunday, February 3, 2008
Website Changes and New Pics!


 We have made some changes to the Pink Piggy Website! I'm so excited because I finally got all new pictures of some of our invites done by Rebekah Westover Photography! Check out our new site and all new pics! Let me know what you think!
Posted by
Megan Bailey - Pink Piggy
at
1:11 PM
2
comments
![]()


